My first ever renovation; my daughters scruffy old pine bedside table and chest of drawers. A good sanding with whatever sandpaper I had in the shed, I realise that that is probably not the done thing in the world of renovation, but it seemed to work. Then a coat of off white paint (Dulux Cupboard Paint, Scuff Resistant and no Primer Needed in Jasmine White). Anyway three coats later and here it is. Not the most professional approach, but it worked. Next time I shall do a more professional job; watch this space.
Budget Bunting
What I used:
Patterned Paper (12" x 12")
Ribbon (as much as you need for the length of bunting required)
Stick Glue
Scissors, zigzag or sraight.
Mini Stapler
Ruler and Pencil
Helping hands from the children
I bought assorted patterned decoupage paper (12" x 12") from The Range, there's lots of colours and styles
Fold a piece of the paper in half
Open the paper up and glue together so it looks like this, both sides will be patterned (I used a simple Stick Glue)
Fold in half again to make a small square and then go to fold in half once more but just making a crease so you know where the middle will be
Open out and draw from the the centre to each corner with a feint pencil line, it will look like this.
Use scissors to cut along the lines (I used zigzag scissors from my childrens craft collection).
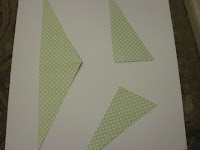
You will then end up with these shapes, pattered back and front
Cut the other two pieces of paper in half like so and tape together to make the last two triangles. Doing this you get four triangles out of one sheet of paper.
Repeat the process as many times as you like with different co-ordinating patterned paper from your pack.
Once you have four of each pattern you like, you can begin to attach the triangles to the ribbon, alternating the patterns.
I used mini staples, you could use strong glue or both. If I did this again I would use ribbon twice the width and wrap it over the triangles so both sides were covered. You could do either.
The finished product
These colours happen to coordinate with my daughters bedroom, so we shall recycle them and use them in her room when we move, yet again Thriving Thrifty!


If you are looking for stylish and convenient bathroom furniture, you have come to the right place. UK manufacturers offer a wide range of bathroom wares at affordable prices. These products are designed to make your life easier and provide comfort and convenience. There are various online stores that sell bathroom furniture. Here are some tips to choose the perfect furniture for your home. We hope you will find what you are looking for. Read on to find out more. Get More Information Bathroom Furniture UK
ReplyDelete